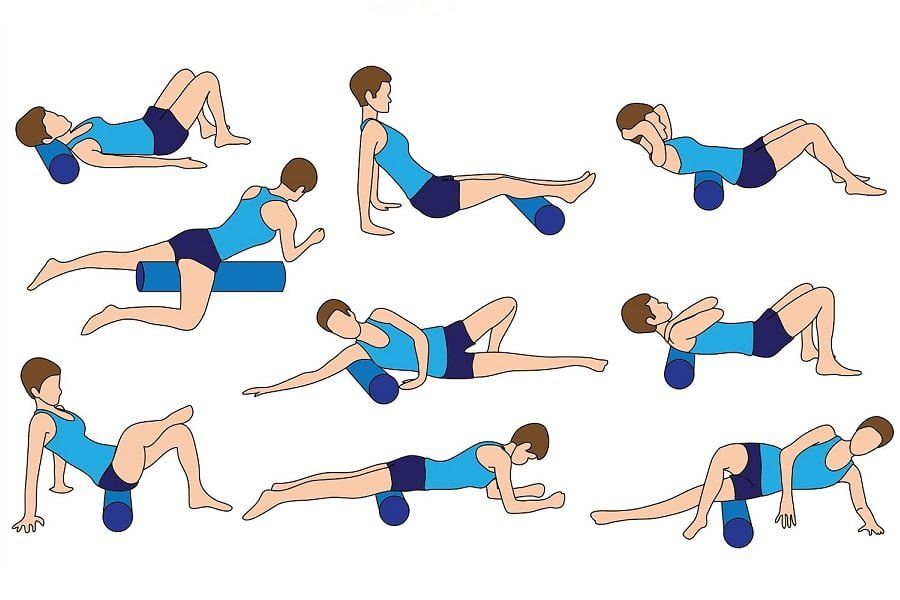
After an intense workout, it’s essential to prioritize recovery to prevent muscle soreness and tightness. One effective way to promote post-workout recovery is through foam rolling. Foam rolling, also known as self-myofascial release, helps release tension in muscles, improve mobility, and enhance overall performance. Here are ten foam rolling techniques that can help you recover and feel better after your workouts.
1. Calves
Begin by sitting on the floor with your legs stretched out. Place the foam roller beneath your calf muscles. Use your hands for support, lift your hips off the floor, and slowly roll the foam roller from your ankles to knees. Don’t rush the movement and focus on areas of tightness or discomfort.
2. Hamstrings
Lie down on your back with the foam roller positioned under your thighs, just above your knees. Support your upper body by placing your hands on the floor. Engage your core and slowly roll the foam roller up towards your glutes. Pay attention to any tight spots along the way and hold the pressure on those areas for a few seconds.
3. Quads
Assume a plank position with the foam roller positioned underneath your thighs. Use your arms to support your upper body and keep your core engaged. Slowly roll the foam roller up and down your quads, applying gentle to moderate pressure. If you encounter a tender spot, hold the position for a moment to release the tension.
4. Glutes
Sit on the foam roller with one ankle crossed over the opposite knee. Lean to one side, shifting your weight onto your gluteal muscles. Roll back and forth over your glutes, targeting any areas that feel tight or sore. Perform the same movement on the other side.
5. IT Band
Lie on your side with the foam roller positioned under your hip, perpendicular to your body. Use your hands and the opposite leg for stability. Slowly roll from your hip to just above your knee, focusing on the outer side of your thigh. Pause on any tender spots and allow the foam roller to work its magic.
6. Adductors
Sit on the floor with your legs extended. Put the foam roller under your inner thighs and use your hands for support behind you. Slowly roll from your knees to your pelvis, targeting the inner thigh muscles. Be mindful of any discomfort and adjust the pressure accordingly.
7. Upper Back
Lie down with the foam roller positioned horizontally beneath your shoulder blades. Support your head with your hands, keeping your feet flat on the floor. Begin rolling up and down, focusing on the upper back muscles. If you feel a knot or tight area, pause and apply gentle pressure until you feel a release.
8. Chest
Lie on your stomach with the foam roller beneath your chest. Extend both arms out to the sides and position your palms facing down. Roll slowly from the base of your chest to just above the waist, targeting the pectoral muscles. Adjust the pressure as necessary.
9. Shoulders
Place the foam roller under your shoulder blades and lie on your back. Bend your knees and position your feet flat on the floor. Extend your arms out to the sides, palms facing down. Roll gently from the base of your neck to the top of your shoulder blades. Pay attention to any areas that feel tight or restricted.
10. Lower Back
Sit on the floor with the foam roller positioned under your lower back. Place your hands on the floor behind you for support. Slowly roll up and down, targeting the muscles in your lower back. Take your time and adjust the pressure to suit your comfort level.
Conclusion
Foam rolling is an effective technique to aid in post-workout recovery. By targeting different muscle groups and releasing tension, foam rolling can alleviate muscle soreness, promote flexibility, and enhance overall performance. Incorporate these ten foam rolling techniques into your post-workout routine and experience the benefits firsthand!
Written by: Your Name
Published on: October 31, 2022